DIY Woodland Theme Christmas Ornaments
This is Part One of the DIY Woodland Christmas Theme Ornaments. Check out DIY Woodland Decorations here.


It’s beginning to look a lot like Christmas, in my mind anyway. The air conditioner is running at full blast while my thoughts are focused on cool visions of a holly jolly season. The theme changes every year, from tree decorations to the matching elements adorning tables and walls of the living room. The theme is chosen by Christmas Day to allow it to unfurl through the course of the year. And don’t you know, the cards, wrapping paper, and tags have to match. I’m excited about this year’s DIY Woodland Theme Christmas Ornaments!
I take advantage of after Christmas sales for items I can’t make and to stay true to a self-imposed shoestring budget. I picked up the standing moose (to the left of the tree) for five bucks last year! During garage sale season, I keep my eyes peeled for great finds at even better prices.
A Pinterest board holds online ideas safe until I set about crafting the treasures in September. DIY Woodland Theme Christmas Ornaments offered endless possibilities. I’m sure you noticed, by looking at the tree, I wanted it all and got a little carried away – I couldn’t help myself!
These directions are straight forward, simple, and approximate – if you need detailed instructions, you’ve come to the wrong place.
The Tree
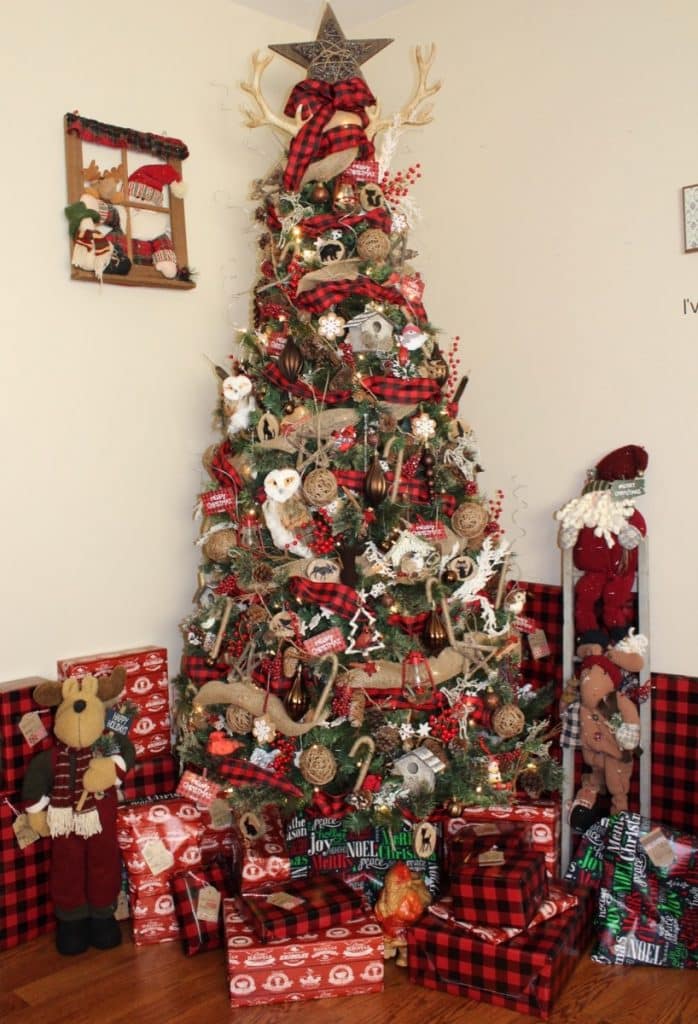
I started with a strand of white glittered snowflakes draped around the tree. I wrapped red and black checked buffalo plaid ribbon clockwise followed by burlap ribbon wrapped counterclockwise. Be sure to pinch the ribbon in random places to add character. Next, I added pinecone garland – pinecones tied about 6” apart on twine.
I keep traditional bulbs separated by color, be sure to choose bulbs that complement your color scheme. For the DIY Woodland Theme Christmas Ornaments, I used brown bulbs (think pinecones), since red was already well represented.
Add ornaments:
- Start with a focal point, a larger item that represents your theme. This year, I used the large owls nesting on a branch.
- Add the biggest ornaments first.
- Disperse matching ornaments evenly over the tree.
- Pay attention to color and space randomly.
Animals for DIY Woodland Theme Christmas Ornaments
- Moose
- Raccoon
- Elk
- Deer
- Bear
- Bird
- Fox
- Owl
- Wolf
- Eagle
- Rabbit
- Goose
Filler Suggestions for the Woodland Theme
- Red berry picks
- Spanish moss nests with a bird
- Small red clothespins for attaching ornaments
- Antlers
- Twigs (either natural or sprayed white with glitter)
- Glass icicles
- Cinnamon sticks
DIY Woodland Theme Christmas Ornaments
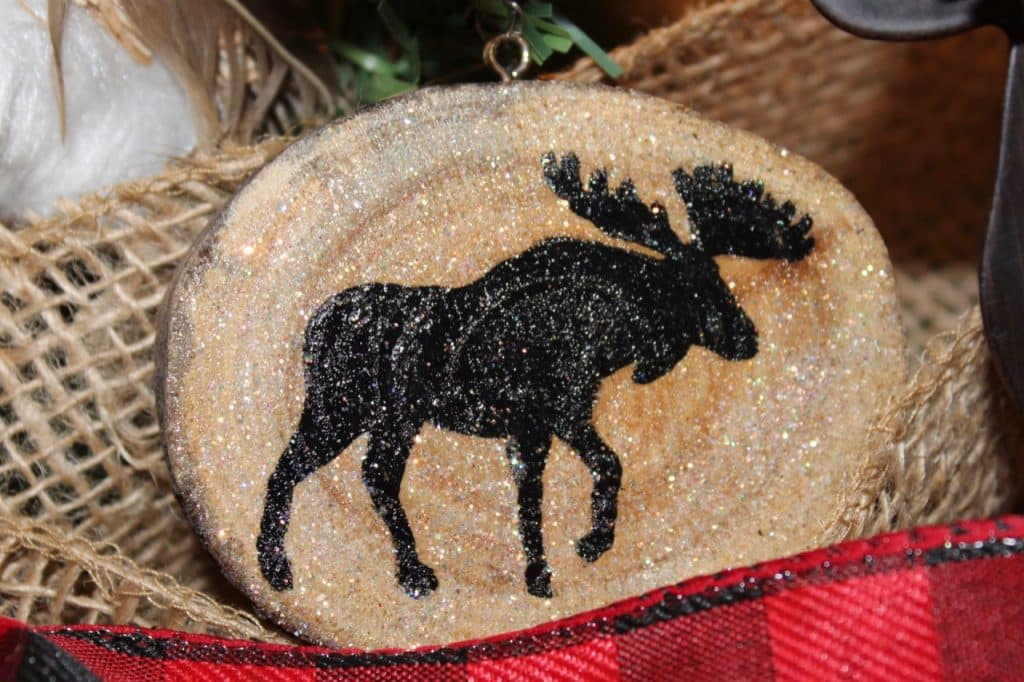
Woodland Slices
- Go on a hike or prune trees in your yard to find 3” diameter branches.
- Cut 1/2” slices.
- Screw a tiny eyelet into the bark edge of the slice.
- I cut woodland animals out of heavy card stock, using my Silhouette machine.
- Trace each animal onto a slice.
- Paint the animal black and add a touch of glitter to shimmer in the tree lights.
There you go, twelve exquisite ornaments for under a dollar.
DIY Tag Brackets
I found a package of twelve wooden bracket tags for two dollars.
- Paint the tags black.
- Trace the animals from the previous project onto the tags.
- Paint the animals tan and add a touch of glitter to the wet paint.
There are twelve more adorable ornaments for your tree.
Lanterns – Woodland Theme
The miniature lanterns were my favorite. I used a mini glass bottle with a cork stopper (found in your hobby store’s jewelry section).
*Hint* Make sure the glass bottle fits into the wooden ring.
To form the bottom of the lantern:
- Glue a wooden ring to roughly the same size wooden circle.
- Paint it red.
To form the top of the lantern:
- Start with a wooden circle (same size as the bottom of the lantern).
- Glue three graduating buttons, top with the cork from the glass bottle.
- Paint the pyramid red.
- Add an eyelet to the cork.
Assemble the lantern:
- When all the parts are dry, place the bottle upside down into the base and glue.
- Glue the button pyramid on top of the lantern.
How easy is that for adorable? Take it one step further by drilling a hole in the bottom wooden circle and cover a light from the tree (remember the glass jar is upside down to hold the lightbulb). The jars came out to twelve cents each and I had the other supplies on hand.
DIY Christmas Stars
- Gather 1/2” diameter sticks.
- Cut to 5″ pieces. You will need 5 sticks for each star.
- Criss-cross the sticks to form a star.
- Add a dab of hot glue to hold the sticks in place.
- To make the stars sturdy and complete the primitive look, wrap twine around each intersection.
These almost-free ornaments are fantastic.
DIY Twine Balls
A primitive theme is incomplete without a few twine balls. Gulp, these babies are expensive. No worries, I grabbed a package of small round balloons and set to work making them for less than a dime each.
- Blow the balloon up to the desired size and tie a knot (mine were the size of a peach).
In a bowl, whisk together:
- 4 ounces of school glue
- 1/2 cup of cornstarch
- 1/4 cup warm water
Make the twine balls
- Put a 3′ piece of twine into the mixture.
- Wrap the twine around the balloon while holding it over the bowl.
- Place the balloon on a disposable cup to dry overnight.
- Pop the balloon and remove it.
- Tie a small piece of twine onto the ball to hang.
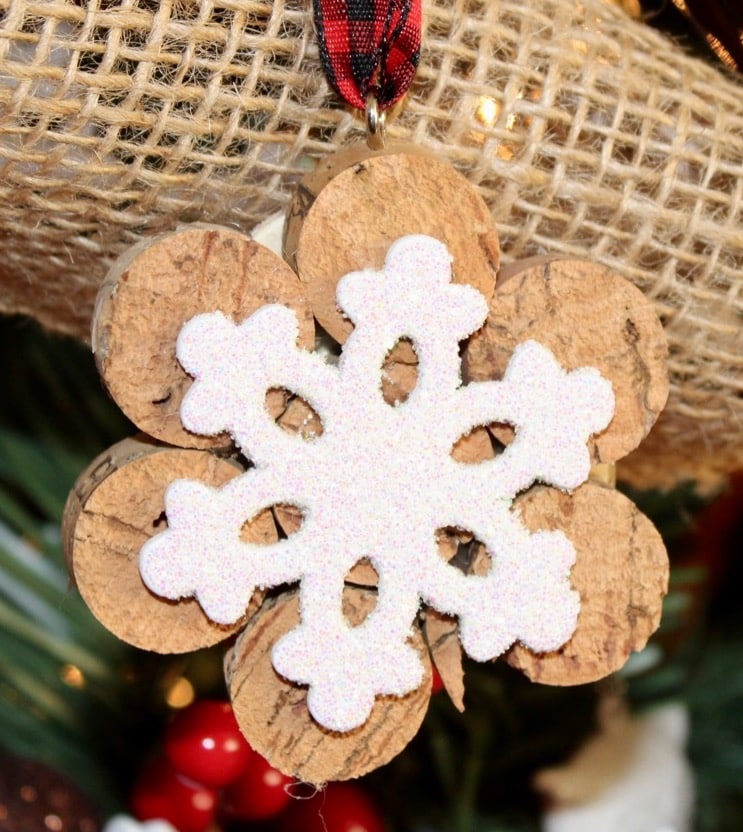
Cork Christmas Ornament
- Slice several wine corks 1/4 – 1/2” thick. Each ornament requires seven cork slices.
- Cut a circle out of a cereal box or other stiff cardboard making sure it is smaller than the finished product.
- Dot glue on the back of the cork and add it to the middle of the circle.
- Add six corks around the center. *Note: add a dot of glue to each connecting cork for extra sturdiness.
- Paint a wooden cutout with a contrasting color. I painted a white snowflake and added a touch of glitter.
- Glue the cutout to the center of cork collage.
- Add an eyelet to the side of a cork slice and loop a string or ribbon for hanging.
These gems cost fifteen cents each. The wine you drank for the corks doesn’t count.
Rustic Candy Cane
- Buy a box of candy canes, better yet, use last year’s leftovers.
- Hot glue twine to the straight end, bottom of the cane.
- Wrap twine around the cane without overlapping and keep it close together. Repeat until you reach the curved end.
- Cut the twine and hot glue it to the end.
Ummm…done. Twelve ornaments for a dollar.
Christmas Tree DIY Clothespins
- Use washi tape or glue strips of scrapbook paper to cover one side of a clothespin.
- Paint wooden shapes with a coordinating color.
- Sprinkle the shape with glitter before the paint dries.
- Glue the shape on the end you pinch to open the clothespin.
Ya, that’s it. Make these for a dime apiece, less if you go to the dollar store.
Woodland Paint Stick Name Tags

- Pick up a couple of paint sticks.
- Cut them in 3” sections.
- Drill a small hole in each corner of one long side.
- Paint. I did a whitewash to allow the natural wood to come through, adding to the rustic look.
- Use the animals you cut out of card stock (for the wood slice ornaments)
- Glue the animal to the stick.
- Use a permanent marker to add a name.
- From behind, thread a 6” thin wire through the holes.
- Wrap the end of the wire around a pencil to curl the ends.
These might cost a nickel if you figure out how much a squirt of paint costs.
Birdhouses

I found paper mache birdhouses at the craft store for a dollar. I painted them with a sponge to acquire the rustic look and added Spanish moss to the perch. The roof was painted brown and dabbed with white texture paint to resemble snow.
DIY Woodland Theme Christmas Decorations
Click here to continue reading about the Woodland Theme – Decorations. Thank you for checking out my DIY Woodland Theme Christmas Ornaments!
Stay Tuned!
This year’s theme is Christmas cookies. I can hardly wait to bring it together. Stay tuned!
2 thoughts on “DIY Woodland Theme Christmas Ornaments”